Friday, December 24, 2010

We made Sweet Potato Gnocchi

Yo guys. It's been a while, we know. But a lot of cooking has been going down since October (!), it's just been a busy busy fall, so our poor blog has been neglected. Hope everyone is having a very nice Christmas Eve right now. At this very moment, I am watching a DVD of a 1978 Bruce Springsteen concert with my dad and bro and drinking some Silk Nog.

Alena, Nat and I made this dish back in early November, and it was so good Alena ended up making it again for her family as a Thanksgiving side dish.

It's really way easier than it looks, just a little time consuming. It's the kind of thing that works best with a couple roommates to make the gnocchis in an assembly line. But it is FREAKING DELICIOUS and healthier and more flavorful than regular potato gnocchi.

We only followed this recipes for the gnocchis themselves. Instead of the sage butter, we made a simple white wine/arugula/garlic/parmesan sauce. (Sautee some garlic and red pepper in olive oil, add a lotta wine, let it reduce a little, then add the arugula, cook for a couple minutes until wilted, then sprinkle in maybe 1/3 c parm, stirring briskly so the sauce gets a creamy texture.)

BUT Alena made the sage butter for Thanksgiving and said it was also great.


  • 2 1-pound red-skinned sweet potatoes (yams), rinsed, patted dry, pierced all over with fork
  • 1 12-ounce container fresh ricotta cheese, drained in sieve 2 hours 1 cup finely grated Parmesan cheese (about 3 ounces)
  • 2 tablespoons (packed) golden brown sugar
  • 2 teaspoons plus 2 tablespoons salt
  • 1/2 teaspoon freshly ground nutmeg
  • 2 3/4 cups (about) all purpose flour
  • 1 cup (2 sticks) unsalted butter
  • 6 tablespoons chopped fresh sage plus whole leaves for garnish

Line large baking sheet with parchment paper. Place sweet potatoes on plate; microwave on high until tender, about 5 minutes per side. Cut in half and cool. Scrape sweet potato flesh into medium bowl and mash; transfer 3 cups to large bowl. Add ricotta cheese; blend well. Add Parmesan cheese, brown sugar, 2 teaspoons salt, and nutmeg; mash to blend. Mix in flour, about 1/2 cup at a time, until soft dough forms.

Turn dough out onto floured surface; divide into 6 equal pieces. Rolling between palms and floured work surface, form each piece into 20-inch-long rope (about 1 inch in diameter), sprinkling with flour as needed if sticky. Cut each rope into 20 pieces. Roll each piece over tines of fork to indent. Transfer to baking sheet.

Bring large pot of water to boil; add 2 tablespoons salt and return to boil. Working in batches, boil gnocchi until tender, 5 to 6 minutes. Transfer gnocchi to clean rimmed baking sheet. Cool completely. (Can be made 4 hours ahead. Let stand at room temperature.)

Preheat oven to 300°F. Melt butter in heavy large saucepan over medium-high heat. Cook until butter solids are brown and have toasty aroma, swirling pan occasionally, about 5 minutes.

Add chopped sage (mixture will bubble up). Turn off heat. Season sage butter generously with salt and pepper.

Transfer half of sage butter to large skillet set over medium-high heat. Add half of gnocchi. Sauté until gnocchi are heated through, about 6 minutes. Empty skillet onto rimmed baking sheet; place in oven to keep warm. Repeat with remaining sage butter and gnocchi.

Divide gnocchi and sauce among shallow bowls. Garnish with sage leaves.


Tuesday, October 5, 2010

I made wild mushroom pizza with caramelized onions, fontina and rosemary


Yo. This pizza was the bomb.

We followed the recipe pretty exactly, except we used way less butter and made one big pizza with our store-bought whole wheat crust instead of a few little ones with homemade dough. (This kind of messed up the proportions, and our pizza was PILED WITH SHROOMS. But you can never have too many shrooms, in my humble opin.) Also discovered that fontina cheese is so freaking good on pizza! Gotta do that more often.

Wild Mushroom Pizza with Carmalized Onions, Fontina and Rosemary


Ingredients
  • 7 tablespoons butter, divided (You don't really need this much. Used a spoonful of Earth Balance combined with olive oil for the onions and the mushrooms.)
  • 2 tablespoons plus 1 teaspoon grapeseed oil (Skipped this.)
  • 3 onions, halved lengthwise, thinly sliced crosswise (about 6 cups)
  • 2 pounds assorted wild mushrooms (such as crimini, oyster, chanterelle, and stemmed shiitake), cut into bite-size pieces
  • 6 garlic cloves, minced
  • 2 tablespoons minced shallot (about 1 medium)
  • 2 cups dry white wine
  • 1 tablespoon minced fresh rosemary

Pizza Dough (If you are less lazy than me)

  • Cornmeal (for dusting)
  • Garlic oil
  • 3 cups grated Fontina cheese (about 10 ounces)

  • Preparation


    Melt 3 tablespoons butter with 2 tablespoons grapeseed oil in heavy large skillet over medium heat. Add onions and sauté until golden, about 45 minutes. Season with salt and pepper.

    Melt remaining 4 tablespoons butter with 1 teaspoon grapeseed oil in another heavy large skillet over medium-high heat. Add mushrooms, garlic, and shallot. Sauté 4 minutes. Add wine and simmer until almost all liquid is absorbed, stirring frequently, about 13 minutes. Add rosemary; season with salt and pepper.

    Position rack in bottom third of oven. Place heavy 17x11-inch baking sheet on rack (invert if rimmed). Preheat oven to 500°F at least 30 minutes before baking. Roll out 2 dough disks on lightly floured surface to 8-inch rounds, allowing dough to rest a few minutes if it springs back. Sprinkle another baking sheet (invert if rimmed) with cornmeal. Transfer 1 dough round to second baking sheet. Lightly brush dough with garlic oil. Sprinkle with 1/2 cup cheese. Scatter 2 1/2 tablespoons onions over cheese. Scatter 1/2 cup mushrooms over onions. Sprinkle with salt.

    Position baking sheet with pizza at far edge of 1 side of hot baking sheet. Tilt sheet and pull back slowly, allowing pizza to slide onto hot sheet. Repeat with second dough disk, garlic oil, cheese, onions, mushrooms, and salt, and slide second pizza onto second half of hot baking sheet. Bake pizzas 6 minutes. Rotate pizzas half a turn. Bake until crust is deep brown, about 6 minutes longer. Using large spatula, carefully transfer pizzas to cutting board. Let rest 1 minute. Slice into wedges and serve. Repeat with remaining ingredients.


    I made harira, the traditional soup of Morocco


    One of my favorite Middle Eastern restaurants, Bedouin Tent in Beorum Hill, serves this kind of soup--a hearty, tomato based soup with lentils and chickpeas and a complex, savory but cinnamon-y flavor. As the weather's gotten colder, I've been in the mood to make soups and thought this was a good one to start the season.

    I did some research and looked at a bunch of recipes on the web. I learned that in Morocco, this soup is eaten for Iftar, the nightly traditional meal that breaks the fast during Ramadan. It's thickened with tadouira--a mixture of tomato paste, flour and cilantro. There are many variations--some include chicken, some lamb. The kind I'd had at Bedouin Tent was veggie, so I knew they had to be out there. Finally I found a few versions which were mainly lentils, chickpeas, tomatoes, spices and vermicelli. And who doesn't like some noodles in their soup? I settled on this recipe and followed it pretty exactly.

    I am being completely honest with you all here: THIS WAS THE BEST SOUP EVER. Seriously guys. You will want to eat this soup ALL THE TIME. It's hearty and filling and noodle-y and tomato-y and lemony and cinnamon/spicy. One bite and you will be like, "Fall and winter: BRING IT ON."

    Harira Soup
    Serves 8

    Ingredients

    Harira

    • 1/2 cup green lentils
    • 1 Tbs. olive oil
    • 1 large onion, chopped (2 cups)
    • 1/2 cup chopped fresh parsley
    • 1/2 cup chopped cilantro
    • 1/2 tsp. ground ginger
    • 1 cinnamon stick
    • 1 15-oz. can chopped tomatoes, drained, liquid reserved
    • 2 cups vegetable broth
    • 1 15-oz. can chickpeas, rinsed and drained
    • 1/2 cup vermicelli
    • Lemon wedges, for garnish

    Tadouira
    • 2 Tbs. all-purpose flour
    • 1/4 cup chopped cilantro
    • 2 Tbs. lemon juice
    • 1 Tbs. tomato paste

    Directions

    1. To make Harira: Cook lentils in pot of boiling salted water 2 minutes. Drain. (I did this but still don't understand why it was necesssary.)
    2. Heat oil in large pot over medium heat. Add onion, parsley, cilantro, ginger, and cinnamon; sauté 5 minutes, or until onion is soft. Stir in tomatoes, and sauté 5 minutes more.
    3. Stir in broth, chickpeas, lentils, reserved tomato liquid, and 3 cups water. Season with salt and pepper, and bring to a boil. Cover, reduce heat to medium-low, and simmer 45 minutes, or until lentils are tender, stirring occasionally.
    4. To make Tadouira: Whisk flour with 1 cup water in bowl. Whisk in cilantro, lemon juice, and tomato paste. Stir Tadouira and vermicelli into Harira, and cook 3 minutes, or until noodles are soft. Serve with lemon wedges.

    Thursday, September 30, 2010

    Okra and Chickpea Stew and my New Kitchen!

    Guess what? I moved to San Francisco!

    I live in the Haight, home of the Summer of Love and the Upper Haight Farmers' Market.

    Here is the kitchen:
    So I went to the farmers' market and bought some okra. Why not? I thought, this will give me a reason to look up a recipe for okra.

    But smitten kitchen didn't have one.

    And our blog didn't have one.

    So I tried TasteSpotting, and I found this Okra and Chickpea Stew Recipe on a blog called Roti N Rice.

    I didn't have a bunch of stuff in the recipe, so I'll note below what I substituted / skipped.

    Okra and Chickpea Stew
    12 oz okra, trimmed
    1 can chickpeas, rinsed and drained (I didn't bother rinsing or draining)
    4 oz roasted lamb, cubed (I didn't have any lamb - omitted)
    2 tomatoes, cubed (I had about 1 cup of cherry tomatoes)
    2 tbsp tomato paste (didn't have any - omitted)
    1 onion, chopped
    2 cloves garlic, chopped
    ¼ tsp tumeric (didn't have any, so I used a combination of: garam masala, cumin, and chili powder)
    2 tbsp olive oil
    1½ cups water (didn't use any -- used the water from the chickpeas instead)

    salt and pepper to taste In a heated pan, add 2 tsp olive oil. Sauté onions and garlic until soft. Add lamb, pepper, and tumeric. Cook for about 2 minutes. Stir in tomato paste. Add chickpeas and water. Bring to a boil. Add okra, reduce heat to medium and let simmer for 10 minutes. Remove and serve immediately with basmati rice.

    even with all the omissions / substitutions, the recipe came out really good!

    yeah!!!

    we ate it with a kale salad with pluot and pepperjack cheese.

    it's like you're there!

    Sunday, September 26, 2010

    We made quinoa gratin with spinach and sweet potato

    I saw this recipe a couple years ago in The New York Times. Except it didn't have sweet potatoes--just a simple quinoa, spinach, gruyere casserole that would make a good side dish. And then last week, Joey and Lauren were coming over for dinner on a gross, rainy day, and I wanted to make something warm and comforting. I thought of this recipe, and decided to add sweet potatoes in order to make it more of a main dish. It worked beautifully! In fact, I think it's a format you can use to make a lot of different quinoa-based casseroles. Quinoa+cheese+vegetable+some kind of spice or herb or something else to flavor it. Like, can you imagine this baby with BUTTERNUT SQUASH? and KALE or CHARD instead of spinach? And maybe some GOAT CHEESE?? Or what about EGGPLANT and some MOZZERELLA?!?!? The possibilities are endless.

    Quinoa Gratin with Spinach and Sweet Potatoes (adapted from Baked Quinoa with Spinach and Cheese)


    Ingredients

    1 6-ounce bag baby spinach

    A few tablespoons extra virgin olive oil

    4 or 5 sweet potatoes, skinned and sliced into medallions or half medallions, depending on the size

    1 medium onion, chopped

    2 plump garlic cloves, minced

    4 cups cooked quinoa, (1 cup uncooked)

    2 large eggs

    3 ounces Gruyère cheese, grated (3/4 cup)

    1 teaspoons nutmeg

    1 ounce Parmesan, grated (1/4 cup)


    Procedure

    1. Preheat the oven to 400ºF. Oil a 2-quart gratin or baking dish.

    2. Heat the oil in a medium frying pan or a wide saucepan over medium heat. Sautee the sweet potatoes slowly until tender enough that you can easily break the pieces with a wooden spoon. Remove from the pan and set aside.

    3. Heat a little more olive oil ithe pan, and add the onion and cook, stirring often, until tender, about 5 minutes. Add the garlic and stir with the onion until fragrant, about 1 minute. Stir in the spinach and season with salt and pepper. Cook just until wilted. Remove from the heat.

    4. Beat the eggs in a large bowl and add 1/2 teaspoon salt. Stir in the quinoa, the onion and spinach mixture, the sweet potatoes the Gruyère, and the nutmeg. Add freshly ground pepper and stir the mixture together. Scrape into the gratin dish. Sprinkle the Parmesan over the top and drizzle on the remaining tablespoon of olive oil. Place in the oven and bake until nicely browned on top, about 25 minutes. Remove from the heat, allow to sit for about 5 minutes, and serve.

    Yield: Serves 4 to 6

    Tuesday, September 14, 2010

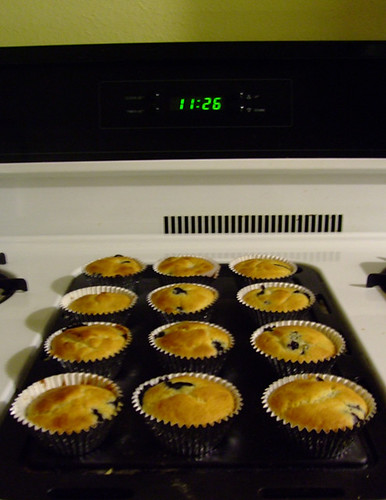
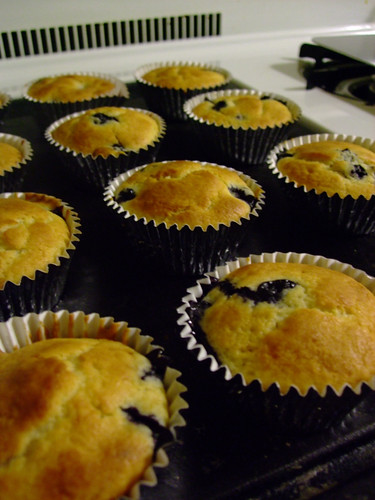
    I made blueberry muffins!


    Long time no post! Hi from sunny Austin, Texas everyone. Lately I've been cooking more (this is mostly inspired by my addiction to this season of Top Chef) and I'm going to let you in on a little secret: I'm not a great cook. What I am pretty good at is baking, so I'm having fun with that these days.

    Recently I stumbled upon the blog Smitten Kitchen. Her recipe for perfect blueberry muffins really caught my eye so after another unsuccessful night of trying to cook an original and delicious dinner (sorry, husband), I opted to make dessert. Below is a slightly tweaked version (aka I didn't add lemon zest because I personally don't like it and I don't have a sifter so that didn't happen either but you can see the original here).

    PERFECT BLUEBERRY MUFFINS! (adapted from Smitten Kitchen)

    5 tablespoons unsalted butter, softened

    1/2 cup sugar

    1 large egg

    3/4 cup plain non-fat yogurt

    1 1/2 cups all-purpose flour

    1 1/2 teaspoon baking powder

    1/4 teaspoon baking soda

    1/4 teaspoon salt

    3/4 cup fresh blueberries

    Preheat oven to 375°F. Line a muffin tin with 10 paper liners or spray each cup with a nonstick spray. Beat butter and sugar with an electric mixer until light and fluffy. Add egg and beat well, then yogurt. Add flour, baking powder, baking soda and salt into batter. Mix just until the dry ingredients disappear. Gently fold in your blueberries. The dough might be thick so Smitten Kitchen lady suggests an ice cream scoop tool to fill your muffin cups [note: I didn't need one. A spoon was fine]. You’re looking for them to be about 3/4 full, nothing more, so you might only need 9 instead of 10 cups. Bake for 25 to 30 minutes, until tops are golden and a tester inserted into the center of muffins comes out clean.

    The end result is beautiful, delicious and pretty dang perfect.


    Wednesday, September 8, 2010

    I made Paletas de Pepino con Limon y Chile (Cucumber Ice Pops With Lime & Chile)


    A few weeks ago, during one of those really hot weeks, I got a lame summer cold! My throat really hurt, and I was drinking a lot of hot tea with lemon, honey, and cayenne pepper. The heat+spice felt really good on my throat, but the tea just made me sweaty and more uncomfortable in the nasty summer humidity.

    Then I saw a post on the website The Kitchn all about sweet+spicy POPSICLES. The perfect thing to soothe my throat AND cool me off!!!

    So I impulse bought some fancy popsicle molds (shaped like rocket ships!!!) and made the recipe below. They are also pretty healthy, which can't hurt when you have a cold! But the point is, you don't NEED to have a cold to enjoy these. They are refreshing, sour, spicy, a little sweet, and of course, nice and cold.

    Paleta de Pepino con Limon y Chile (Cucumber Ice Pop With Lime & Chile)

    Makes about 5/6 pops

    * 2 cucumbers (about 2 pounds), peeled, seeded and chopped
    * 1 tablespoon sugar - (I used honey because I thought it would taste good too.)
    * 1/4 cup fresh lime juice
    * 1/2 teaspoon habanero chile powder -- (OR you can totally substitute cayenne pepper, which is what I did. Just add a little (few pinches) at first, and then add more if you want to make it more spicy. Apparently you can find habenero powder at places like Whole Foods.)
    * 1/2 teaspoon kosher salt

    Instructions: In a food processor (or hand blender), pulse all but 1/2 cup of the cucumber until smooth. Strain into a bowl; you should have about 2 cups juice. (I did not strain. It came out fine! But if you want a really uniform texture, go ahead and strain.)

    Add the rest of the ingredients and pour about 1/3 cup of mixture into each mold. Freeze for at least 2 hours.

    Sunday, August 22, 2010

    We made zucchini pancakes and ate them while watching Sharon Jones and the Dap Kings at Prospect Park!


    Pictured above is my mother holding a giant zucchini she grew in her garden while Alice the Basenji looks on. This zucchini, may it rest in peace, was as thick and almost as long as my arm. (My mom was a little embarassed to have her picture taken with it. "It's obscene!") I knew I had to make something special with it, but I didn't know what. And then Alena reminded me of a post I'd seen on Serious Eats for zucchini pancakes. It was the perfect thing to take with us to the Sharon Jones concert that night.


    Zucchini Pancakes

    Ingredients
    • 2 medium zucchini (Or one obscenely giant zucchini which probably equaled more than two mediums.)
    • 1/2 medium yellow onion
    • 1/2 teaspoon salt
    • 2 eggs
    • 1 clove garlic, finely minced
    • 1/4 cup parmesan cheese
    • 1/4 teaspoon minced fresh thyme or oregano (We used thyme.)
    • 1/4 teaspoon grated lemon zest (This really made a big difference! We probably added more than the recipe, and it really added a nice dimension to the flavor.)
    • 1/8 teaspoon freshly ground black pepper
    • 6 tablespoons flour
    • 1 teaspoon baking powder
    • 2 tablespoons olive oil, plus more if needed

    Procedure

    1. Shred the zucchini and onion on the large holes of a box grater or in a food processor with the shredding disk. Place the shredded vegetables in a colander in the sink and sprinkle with the salt. Toss to combine. Let drain for 30 minutes, then pick up by the handful and squeeze out as much moisture as possible. Place on a kitchen towel or double layer of paper towels. (We should have taken this step more seriously--ours came out a little mushy, though still delicious.)

    2. In a medium bowl, combine the eggs, garlic, cheese, herbs, lemon zest, and pepper. Beat well with a fork. Add the drained zucchini mixture and mix together. Sprinkle the flour and baking powder on top and mix with a fork just until well combined.

    3. Heat one tablespoon of the olive oil over medium-high heat in a wide, heavy pan. When the oil is hot, drop the batter into the pan by heaping tablespoonful. Cook for about three minutes on the first side, until nicely browned. Flip and cook for about two minutes more. Place the cooked pancakes on a paper towel-lined plate and repeat with the remaining oil and batter. Serve with a dollop of Greek yogurt, sour cream, tzatziki or applesauce.


    We decided to go with tzatziki because my parents had also recently given me packet of tzatziki mix they brought back from their trip to Greece.

    The mix really made a difference. Tzatziki is so often too bland. We just added yogurt, lemon, a little olive oil, and some chopped up cucumber. It was perfect on the pancakes!

    Here are Lauren, Alena and Keelin enjoying our picnic at the concert:

    Click here for a youtube vid from the concert! Sharon Jones is my hero.

    Friday, August 20, 2010

    I made Gnudi w/ onion, sausage, wilted arugula + toasted walnuts!


    So back in May, my parents celebrated their 40th wedding anniversary! I told them I would like to cook them dinner as an anniversary gift, but then we could never find a date that worked until the very end of July. But, finally, the day came around and I tried to figure out what to make.

    All I knew was that I wanted to make something summery, and simple - but impressive. After looking at a few recipes, I decided to make GNUDI, the potato-less, lighter cousin of gnocchi. Even though I was a bit apprehensive about making something for the first time for such an important occasion (what if it comes out wrong??) I decided to just go for it.

    Turns out, it was really not all that hard!! Phew. Here is what you need:

    Kosher salt and freshly ground pepper
    Unsalted butter
    1 bunch tarragon (I also think other herbs like basil, sage, rosemary, etc. would work.)
    1 lemon
    1 small white onion
    1 egg
    ¾ lb fresh ricotta cheese
    ¼ lb freshly grated parmigiano reggiano
    1/3 cup semolina flour
    1 tbls all purpose flour
    small bag whole, shelled walnuts
    a bunch of baby arugula
    sausage of your choice (optional) - I used D'artagnan brand chicken sausage with truffles - fancy! -(Mushrooms would be a good vegetarian alternative in this recipe.)
    homemade or store-bought vegetable stock for poaching the gnudi (optional) - I just used water.

    Make the Gnudi Mixture

    In a small mixing bowl, combine the ricotta, one tablespoon chopped tarragon, egg, Parmigiano, half of the flour and the tbls of all-purpose flour. Using a wooden spoon, mix until the ingredients are well combined. Salt and pepper to taste.

    Place the remaining flour in a shallow bowl. Using floured hands, pinch about a tablespoon worth of mixture and form into a little football shape. Dredge each through the flour in the bowl and onto a baking sheet. Continue this until you’ve made as many gnocchi shaped pieces as you can. You can either immediately poach them or cover with foil and refrigerate for up to a few hours.


    (The lemon in the photo gives you an idea of the size of these.)

    Poach the Gnudi

    Bring either stock or plain water to a simmer (not boil). Take out the gnudi and drop 5 or so into the pot for about 2 minutes, or until they rise to the top of the liquid. Remove with a slotted spoon and place on a clean flat baking sheet. Do this for all of the gnudi, being gentle and taking care not to break them as they can be delicate. Refrigerate for up to a day, or let rest for about a half hour before finishing the dish.

    Make the toppings

    Roughly chop the walnuts and toast them, either in a pan or an oven. Watch them closely so they do not burn! Sautee the onion in some butter or oil slowly in a large pan until translucent. Season with salt and pepper and some lemon juice. Chop and add sausage (or mushrooms) if using. Sautee until sausage (or mushrooms) are browned. Carefully add the gnudi to the mixture, gently stirring just to incorporate the ingredients and heat the gnudi. They are very delicate ! You don't want to break them. Add the arugula just for a moment, it will wilt quickly.

    Plate up the gnudi and season with some more grated Parmesan cheese, salt, pepper, and lemon juice.

    I served this with a kale salad with mint and lime dressing and some baby heirloom tomatoes that I marinated in oil, garlic and salt + pepper.

    For dessert I made a fruit salad with multi-colored plums, blueberries, and marinated it for a few hours with some honey, lime juice and chopped mint. We had it with vanilla ice cream!

    Man, it was a pretty awesome summer dinner!! Happy anniversary to my parents.

    Monday, August 16, 2010

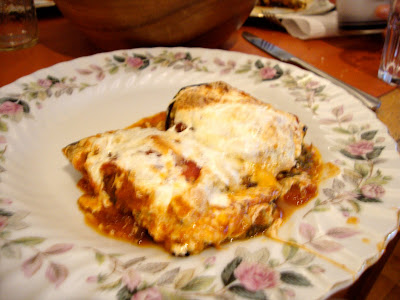
    We made eggplant parmesan rolls with swiss chard and mint!


    The other day, Hillary and Faryl came over for dinner. Alena and I decided it was finally time to make a recipe I had noticed on epicurious and emailed to her a long, long time ago, especially since eggplant and swiss chard are now in abundance, AND Alena happened to have some fancy ricotta cheese left over from making gnutti for her parents (girl when you gonna post that?).

    Well, it was a complete success. This is a delicious, lighter, summerier alternative to eggplant parm or traditional eggplant rollatini. The eggplant is broiled instead of fried, the Swiss chard adds some green, and the fresh mint gives it a nice kick.

    Eggplant Parmesan Rolls with Swiss Chard and Mint

    Ingredients
    • 2 medium eggplants (about 2 1/4 pounds total), trimmed, cut lengthwise into 1/4-inch-thick slices
    • Coarse kosher salt
    • Extra-virgin olive oil
    • 1 1-pound bunch Swiss chard, center ribs removed
    • 2 large eggs
    • 1 15-ounce container whole-milk ricotta cheese
    • 1 1/4 cups finely grated Parmesan cheese, divided
    • 2 tablespoons chopped fresh mint
    • 3/4 teaspoon freshly ground black pepper
    • 1 15- to 16-ounce can tomato sauce
    • 1 8-ounce ball fresh water-packed mozzarella,* drained, thinly sliced

    Cover bottom and sides of each of 2 large colanders with 1 layer of eggplant slices; sprinkle generously with coarse salt. Continue layering eggplant slices in each colander, sprinkling each layer with coarse salt, until all eggplant slices are used. Place each colander over large bowl; let stand at least 30 minutes and up to 1 hour. (We just laid them out on paper towels, which worked fine.) Rinse eggplant slices to remove excess salt; dry thoroughly with paper towels.

    Position oven rack 5 to 6 inches from heat source and preheat broiler. Line 3 large rimmed baking sheets with parchment paper. Arrange eggplant slices in single layer on prepared baking sheets. Brush both sides of eggplant slices with olive oil. Broil 1 sheet at a time until eggplant slices are tender and beginning to brown, watching closely and removing eggplant slices as needed if cooking too quickly, 3 to 4 minutes per side. Remove baking sheet from oven and cool eggplant while preparing filling.

    This was our first time using our oven's broiler!

    Bring large pot of salted water to boil. Add chard to pot and boil just until tender, about 2 minutes. Drain; rinse with cold water. Squeeze chard very dry, then chop coarsely. Squeeze chard dry again between paper towels. Whisk eggs and pinch of coarse salt in medium bowl. Stir in chopped chard, ricotta cheese, 1 cup Parmesan, mint, and black pepper.

    Lightly oil 15 x 10 x 2-inch glass baking dish. Spread half of tomato sauce evenly over bottom of dish. Divide chard-ricotta filling among eggplant slices, placing about 1 heaping tablespoon filling in center of each. Starting at 1 short end of each, loosely roll up eggplant slices, enclosing filling. Arrange rolls, seam side down, atop sauce in baking dish. Spoon remaining tomato sauce over. Place mozzarella slices in single layer over rolls. Sprinkle with remaining 1/4 cup Parmesan cheese. DO AHEAD: Can be made 1 day ahead. Cover with foil and chill.

    Preheat oven to 350°F. Bake eggplant Parmesan rolls, covered with foil, until heated through, about 30 minutes if freshly made or 40 minutes if refrigerated. Uncover and bake until brown in spots and sauce is bubbling, 15 to 20 minutes. Serve hot.

    Here is us chilling on the fire escape while the eggplant baked:

    And here is an aerial view of our meal. It looks like Hill's arm is moving SO FAST!!!


    YUM.

    Wednesday, July 28, 2010

    I made ratatouille--spicy, hot herby.

    I tried making ratatouille about a year ago, and I wasn't crazy about it. I have realized two things since then: 1. I don't like fennel. Maybe in small doses, but that recipe was very fennely. 2. The kind of ratatouille I have been craving is the more Mediterranean variety I had when I was in Spain, which is more SPICY and less HERBY, which I guess is more French.

    ANYWAY, The Moosewood Cookbook has both herby and spicy options, and I chose the latter. SUCCESS! It was everything I've ever wanted ratatouille to be! So delicious! And a great way to use summer veggies!

    Moosewood Ratatouille

    3 T olive oil
    4 medium cloves garlic
    2 c chopped onion
    1 medium eggplant, cubed
    1 1/2 t salt
    1 1/2 t basil
    1/2 t thyme
    1/2 t cumin
    2 t chili powder
    cayenne to taste
    1 c pitted, oil-cured olives (I used Kalamata)
    1 medium zucchini, cubed
    2 medium bell peppers, in strips
    fresh black pepper
    1 14oz can tomatoes (I used fire-roasted)
    freshly minced parsley
    juice of one lemon

    1. Heat olive oil in a deep skillet or Dutch oven. (I used two skillets: garlic, onion and eggplant in one, zucchini and pepper in the other. You want there to be enough surface area so all the veggies can saute evenly.) Add garlic and onion and saute over medium heat for about five minutes.

    2. Add eggplant, salt, spices and herbs, and stir. Cover and cook over medium heat, stirring occasionally, for 15 to 20 minutes or until eggplant is soft.

    3. Add zucchini, bell pepper, black pepper, and tomatoes. Cover and simmer for about ten more minutes, or until zucchini and bell peppers are tender. (I browned the zucchini and peppers, then combined with the eggplant, then added the tomatoes.)

    I recommend serving over couscous!

    Tuesday, July 27, 2010

    I made quinoa, corn and edamame salad


    Got this recipe from NY Times Recipes for Health. Delicious. Refreshing. Nutritious. Takes about two secs to make. Bring it to a picnic!

    Quinoa, Corn and Edamame Salad

    For the salad:

    1 cup quinoa, cooked

    2 ears sweet corn (I used canned. So sue me.)

    1 small red onion, finely diced

    1 red bell pepper, cut in small dice

    1/2 cup thinly sliced celery, from the tender inner stalks

    4 or 5 radishes, sliced

    1/2 cup fresh or thawed frozen edamame (This is the trick to dealing with frozen edamame: it really only needs to thaw, not cook. No matter what the directions say on the package, put it in boiling water for one, maybe two minutes and that's IT. Otherwise they get mushy. Then salt them separately. They need salt. And lime juice is great if you're eating them by themselves.)

    2 ounces feta, cut in small dice, optional (who ever opts out of cheese?)

    1 jalapeño or serrano chile, minced

    1/2 cup chopped cilantro

    I added one avocado, cubed

    For the dressing:

    2 tablespoons fresh lime juice

    1 garlic clove (more to taste), finely minced or pureed

    1/4 cup extra virgin olive oil

    Salt to taste

    1. Cut the corn kernels away from the cobs. Discard the cobs (or use for stock), and place the kernels in a steamer above 1 inch of boiling water. Cover and steam for four minutes. Remove from the heat, rinse with cold water and drain.

    2. Soak the onion in cold water to cover for five minutes. Drain, rinse and drain on paper towels.

    3. Combine all the salad ingredients in a large bowl. Whisk together the dressing ingredients and toss with the salad. Serve.

    Serves four to six.

    I made Summer Borscht in honor of my move to Greenpoint


    Sometimes I see recipes on various websites and blogs that sound delicious, so I copy and paste them into an email, and send it to myself. Then I file them in a folder in my email entitled "RECIPES". The problem is, I sometimes forget to click on that folder when I am in the mood to cook something.

    That is what happened with this recipe, which I originally saw on the blog Not Eating Out in New York. I emailed it to myself almost a year ago (October 13, 2009 to be exact) and only just thought of it and made it the other week.

    As Laura mentioned, it has been HOT in NYC and this is a nice, chilled soup which only requires a tiny bit of stove time to make.

    This was also the first real meal that I cooked in my new apartment in Greenpoint, and while I was making it, I realized how funny that my first cooking endeavor there would be borscht, since Greenpoint is a largely Polish neighborhood full of restaurants serving lots and lots of bowls of the famous soup. I think there was something subliminal going on here.

    So this is the recipe, with my notes!


    Jui Shih’s Summer Borscht
    (makes about 6-8 servings)

    about 5 medium-sized beets, boiled or roasted until tender, peeled and diced *I boiled the beets, which was nice and easy. You could also do this ahead of time if you want, because it is really the only time consuming element of the dish.
    about 2 English cucumbers, diced - I used cucumbers that I bought at the Eagle Street Rooftop Farm in Greenpoint too!! A very Greenpoint meal.
    about 3-4 medium tomatoes, diced
    3 cups chicken or vegetable broth (chilled or room temperature)
    2 cups plain yogurt
    1/4 cup red wine vinegar (or more to taste)
    1 small bunch fresh dill, chopped
    salt and pepper to taste
    fresh lemon juice and zest to taste (optional) - I went for it.
    chopped scallions or chives for garnish (optional) - I omitted.
    sour cream to garnish (optional) - Omitted.


    Reserve any juices from the beets, tomatoes and cucumbers while chopping and combine them in a large pot or bowl with the broth and yogurt. Add the vinegar, dill, a pinch of salt and pepper, and taste. Sugar can be added to cut the acidity as well, to taste. Add optional lemon juice and anything else to taste. Top each bowl with optional garnishes of chopped scallions or chives, extra dill, and/or a scoop of sour cream.

    *I also used the hand blender a bit to make the soup a little thicker. I only blended it until the pieces of vegetable were a bit smaller and some had been pureed. I think the soup benefits from the texture of the crunchy veggies, so don't go overboard if you take this advice!*


    Monday, July 26, 2010

    I made Beet Carpaccio and Pappardelle with Zucchini Ribbons!

    It is hot! If you live in New York, this is not news, but I still can’t get over it. Food-wise this means I’ve been desperately trying to avoid using the stove while still making use of all the beautiful produce that’s around/feeding myself. Here are two recipes, one that doesn’t use the stove at ALL and one which does, but not for a crazy amount of time.

    The beet carpaccio recipe is from Epicurious and it actually calls for roasted beets, which I’m sure would be delicious, but which isn’t going to happen in my kitchen until it’s cooler. I ignored the roasted part and used the beets raw and it was delicious! Also, the dressing for this is ridiculously good and could be good on many other things. My notes in bold!


    • 12 2-inch beets, trimmed
    • 1 cup crumbled soft fresh goat cheese (about 5 ounces)
    • 2 tablespoons minced shallot
    • 1/3 cup unseasoned rice vinegar
    • 1/3 cup chopped fresh mint
    • 1/4 cup walnut oil or olive oil (I used olive oil)
    • 1 1/2 teaspoons sugar (I only used one teaspoon)
    • 1/4 cup chopped fresh chives

    Preheat oven to 350°F. Line rimmed baking sheet with foil. Place beets on sheet (if using both light- and dark-colored beets, place them on separate sheets to prevent discoloration). Sprinkle beets lightly with water. Cover tightly with foil. Bake until beets are tender when pierced with fork, about 40 minutes. Cool on sheet. Peel beets. (Can be prepared 1 day ahead. Place in resealable plastic bag; chill.) (I skipped this step and just peeled the beets and used a mandoline on the smallest setting to slice them thinly)
    Using cheese slicer or knife, slice beets very thinly. Slightly overlap slices on 6 plates, dividing equally. Sprinkle with cheese, then shallot, salt, and pepper. Whisk vinegar, mint, oil, and sugar in small bowl. Season with salt and pepper. Drizzle over beets. Sprinkle with chives.

    The next day, we had leftover dressing and I decided to incorporate it into this other “low-cook” recipe from the blog Cooking Books (http://cooking-books.blogspot.com/) which I ran across on the Serious Eats Photograzing section.

    Pappardelle with Zucchini Ribbons


    2 tablespoons chopped fresh basil
    Juice of one lemon
    1 teaspoon Dijon mustard
    salt and pepper to taste
    Enough olive oil to suit your taste and coat the pasta

    Whisk all of these together and set aside. (I skipped this whole above piece and used the leftover dressing from the beets, but I’m sure this is excellent as well!)

    For the pasta and zucchini:
    1 package pappardelle pasta
    1 tomato chopped (I put in cherry tomatoes cause big tomatoes aren’t *quite* in season here)
    2 zucchinis, peeled into ribbons using a vegetable peeler (I had one big one -- all good!)
    I added some quickly sauteed spinach and garlic, and threw some cubes of fresh mozzarella on top. Goat cheese would also be good, I bet.

    Cook the pappardelle pasta according to package directions, and combine with the tomato and the zucchini ribbons. Toss with the vinaigrette while the pasta is still warm. Allow to come to room temperature before serving.


    Sunday, July 25, 2010

    I made granola and reminisced about Minneapolis

    I realize we already have a granola recipe here, but you can never have too many granola recipes, right?

    So I visited my friend Leah last week in Minneapolis, and it was a perfect midwest mini-vacation. Leah is an amazing host, and one of the highlights of the trip was eating her homemade granola with yogurt and white nectarines (why can't I find good nectarines here??) every morning.

    Another culinary highlight of the trip was the Juicy Lucy (sometimes spelled Jucy Lucy), which is a cheeseburger with the cheese in the middle of the burger. Maybe sometime I will try to make those. (The photo of Leah above was taken in the oddly-oriented restroom of Matt's, the bar in Minneapolis where Jucy Lucys were invented. Or weren't. Check wikipedia, I guess.)

    Another culinary highlight of the trip was this drink: Jameson whiskey and R.W. Knundsen's Simply Nutritious Lemon Ginger Echinacea juice.

    But back to the granola! I was thinking of calling Leah to ask her how she made it, but I didn't want to wake her up (why am I making granola at midnight?). I think she said she used Smitten Kitchen's recipe? So this is an adaptation of that.

    Ingredients:

    3 cups rolled oats
    1 cup coconut chips
    1/4 cup vegetable oil
    1/3 cup chopped almonds
    2/3 cup chopped pecans
    1/3 cup brown sugar
    1/4 cup honey
    cinnamon
    salt
    1/2 cup dried cranberries
    1/2 cup dried figs, chopped (man, I could take pictures of figs all day)

    Method:

    Preheat oven to 375. Line a shallow baking pan with parchment paper. Shoo the cat away from the ingredients.

    Mix together all the ingredients except the dried fruit, and spread mixture evenly on the baking pan. Bake for 15 minutes, checking on it and stirring it a couple times. Add dried fruit, and bake for 5 more minutes.

    Remove from pan and cool. And, oops, pick out the burnt bits. Next time, readjust oven temperature / baking time.

    And this I learned from Leah, as well as from Smitten Kitchen: keep the granola in the freezer! It will stay crispy forever that way.

    Hey you want some granola? Sounds good, let's have some when we go back inside.

    Thursday, July 15, 2010

    I made Caesar salad with grilled salmon! (well, Joey grilled the salmon.)

    I made this to celebrate Alena's first official night as a resident of my apartment! I looked at a bunch of recipes and eventually improvised based on my research:

    First I made some croutons. Cut some peasant bread into cubes and coated in olive oil, garlic powder, salt and paprika. Baked on 350 for 10 minutes.

    Then I made the dressing, by putting the following things in a blender.

    1 egg. That's right, a raw egg. You can coddle it by cooking for 45 seconds, but I decided coddling is for pansies. Raw eggs don't scare me.
    4 anchovies, minced
    1/2 cup grated parm
    1 tsp Worcestershire sauce
    1 garlic clove
    1 tsp sherry vinegar
    1 generous tsp dijon mustard
    1/3 cup olive oil
    a little s&p.

    Then I blended that shit.

    Joey grilled the salmon on a griddle. It seemed pretty simple: just some olive oil, s&p, slapped it on the griddle a few minutes on each side.

    Then we threw some chopped romaine in a bowl, along with the grilled salmon, which was cut into chunks and the croutons. Tossed it with the dressing. Garnished with some more parm. Boom.

    P.S. Here is a video I made while I was cooking.


    JUST KIDDING!!!! I found it on youtube and it made me laugh! Especially the music!!! Hahaha. But that is pretty much how you make a Caesar salad.

    Tuesday, July 13, 2010

    I Made Edamame Hummus!

    Hey, it's been a while since I've contributed to this blog! I first tried this recipe last fall, when I had a craving for edamame hummus from Teany (90 Rivington St.) but that restaurant (partly owned by Moby) was closed due to a fire or disaster. Also, I didn't want to try the Trader Joe's version, partly because I was too lazy to go downtown and partly because I thought I could do better and cheaper myself. Anyway, I found this recipe from the Food Network. It's pretty good!

    Ingredients and Directions
    My friend Tina, who is working on a book of vegan baking recipes, introduced me to this format of outlining recipes.
    • 1/2 pound frozen shelled edamame (green soy), about 1 1/2 cups
    Boil the beans in salted water for 4 to 5 minutes, or microwave, covered, for 2 to 3 minutes.

    • 1/4 cup tahini
    • 1/4 cup water
    • 1/2 teaspoon freshly grated lemon zest
    • 1 lemon (about 3 tablespoons), juiced
    • 1 clove garlic, smashed
    • 3/4 teaspooon kosher salt
    • 1/2 teaspoon ground cumin
    • 1/4 teaspoon ground coriander (Err-- I couldn't find this, so I tried sage. Still good.)

    In a food processor, puree the edamame, tahini, water, lemon zest and juice, garlic, salt, cumin, and coriander until smooth.
    • 3 tablespoons extra-virgin olive oil
    With the motor running, slowly drizzle in 2 tablespoons of the olive oil and mix until absorbed.
    • 1 tablespoon chopped fresh flat-leaf parsley (Anyone have tips on what to do with tons of leftover parsley?!)
    Transfer to a small bowl, stir in the parsley and drizzle with remaining oil. Serve with the suggested vegetables, or refrigerate, covered, up to 1 day.

    Lately, I've been eating tons of hummus spread on sourdough bread and toasted til the hummus is crusty. You can, of course, eat this however you eat "regular" hummus.

    Saturday, July 3, 2010

    I made gazpacho just like the kind I had all the time in Spain!


    I spent the summer of 2003 in Granada, Spain, where I became insatiably addicted to two things: olives and gazpacho. It was the summer of that record breaking heat wave in Europe, and I just could not get enough of this simple, nutritious, refreshing soup. Since then, I still eat olives constantly, but I had to go through gazpacho withdrawal--nobody, not even fancy restaurants, makes it like they do in Spain. In the US, it's always more like salsa in a bowl--chunky with lots of other vegetables and heavy on the cilantro and cayenne, which is more Mexican than Spanish. But the real thing is actually a thin, simple, vinagery soup, with a slight salty/sweet bite, sometimes garnished with chopped veggies like cucumber, bell pepper, etc.

    A few weeks ago, years after I'd lost hope of ever finding anything resembling the gazpacho I once ate every day for a whole summer, I did a simple search on epicurious and found this recipe for Classic Andalusian Gazpacho, adapted by Gourmet from a famous restaurant in Cadiz, a small city on the Costa del Sol. It looked promising: garlic, soaked bread, tomatoes and SHERRY VINAGER (duh! how could I not have thought of that!) a little cumin (that I would not have guessed), a little sugar, a little salt, a little olive oil.

    As soon as I started mixing the ingredients, I knew my gazpacho mania was on its way back, and I think it's here to stay.

    Here's the recipe, copied and pasted with comments:

    Classic Andalusian Gazpacho


    Ingredients

    • 1 (2-inch-long) piece baguette, crust discarded (I used ciabatta)
    • 2 garlic cloves
    • 2 teaspoons salt
    • 2 tablespoons Sherry vinegar (preferably "reserva"), or to taste
    • 1 teaspoon sugar
    • 1/2 teaspoon ground cumin (optional)
    • 2 1/2 lb ripe tomatoes, cored and quartered
    • 1/2 cup mild extra-virgin olive oil (preferably Andalusian hojiblanca)
    • Garnish: finely chopped red and green bell peppers (as you can see in the photo above, I also garnished with chopped avocado, which isn't exactly traditional but whatareyougonnado.)

    Soak bread in 1/2 cup water 1 minute, then squeeze dry, discarding soaking water.

    Mash garlic to a paste with salt using a mortar and pestle (or mince and mash with a large knife). Blend garlic paste, bread, 2 tablespoons vinegar, sugar, cumin, and half of tomatoes in a food processor (I threw it all in a bowl and used a hand blender.) until tomatoes are very finely chopped. Add remaining tomatoes with motor running and, when very finely chopped, gradually add oil in a slow stream, blending until as smooth as possible, about 1 minute.

    Force soup through a sieve into a bowl, pressing firmly on solids. Discard solids. (This is the only tricky part, but totally worth it--in the epicurious comments, some people wrote that they skipped this step but without it, you will have mushy soup that separates from the liquid, instead of smooth perfect deliciousness. So just be patient. Pour it in a little at a time and swish it around in the strainer. My trick has been to use the back of a large serving spoon to spread it around, let it drip through a little, then gather it up into a pile of mushy tomato stuff and press on it.)

    Transfer to a glass container and chill, covered, until cold, about 3 hours. Season with salt and vinegar before serving.

    Serves about 4.


    Thursday, July 1, 2010

    We made Bittman's braised artichokes

    It's artichoke season, but lately it seems like they've been flying off the racks at grocery stores. I always notice them when I don't need them, but then when I come back, they're gone. Especially after reading Mark Bittman's article on braising artichokes complete with a witty ("it's artiCHOKE not artiSWALLOW!") instructional video, I was intent on finding some artichokes to braise.

    When I finally found them, Martha and I decided to make our own witty instructional video, below, as a Bittman homage:


    Here's the recipe, copied and pasted. We followed it pretty exactly.

    Bittman's Braised Artichokes

    Ingredients

    4 medium artichokes

    4 tablespoons butter ( 1/2 stick)

    1 cup chicken stock, or more as needed

    Salt and freshly ground pepper

    Zest and juice of 1 lemon.

    1. Cut each of the artichokes in half; remove the toughest outer leaves, use a spoon to remove the choke, and trim the bottom.

    2. Put 3 tablespoons of the butter in a large, deep skillet over medium-high heat. When it melts and foam subsides, add artichokes, cut side down. Cook until lightly browned, about 5 minutes. Add stock (it should come about halfway up the sides of the artichokes), bring to a boil, and cover; turn heat to medium-low. Cook for about 20 minutes or until tender, checking every 5 or 10 minutes to make sure there is enough liquid in the pan, adding more stock as necessary. Sprinkle with salt and pepper, and transfer artichokes to serving platter.

    3. Raise heat to medium-high and cook, stirring occasionally, until liquid is reduced to a sauce. Stir in lemon zest and juice and remaining tablespoon butter; taste and adjust seasoning. Serve artichokes drizzled with sauce.

    Yield: 4 servings.