Showing posts with label faryl. Show all posts

Monday, August 16, 2010

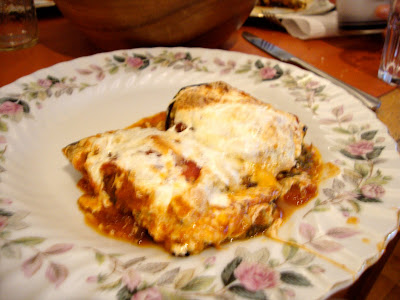
We made eggplant parmesan rolls with swiss chard and mint!


The other day, Hillary and Faryl came over for dinner. Alena and I decided it was finally time to make a recipe I had noticed on epicurious and emailed to her a long, long time ago, especially since eggplant and swiss chard are now in abundance, AND Alena happened to have some fancy ricotta cheese left over from making gnutti for her parents (girl when you gonna post that?).

Well, it was a complete success. This is a delicious, lighter, summerier alternative to eggplant parm or traditional eggplant rollatini. The eggplant is broiled instead of fried, the Swiss chard adds some green, and the fresh mint gives it a nice kick.

Eggplant Parmesan Rolls with Swiss Chard and Mint

Ingredients
  • 2 medium eggplants (about 2 1/4 pounds total), trimmed, cut lengthwise into 1/4-inch-thick slices
  • Coarse kosher salt
  • Extra-virgin olive oil
  • 1 1-pound bunch Swiss chard, center ribs removed
  • 2 large eggs
  • 1 15-ounce container whole-milk ricotta cheese
  • 1 1/4 cups finely grated Parmesan cheese, divided
  • 2 tablespoons chopped fresh mint
  • 3/4 teaspoon freshly ground black pepper
  • 1 15- to 16-ounce can tomato sauce
  • 1 8-ounce ball fresh water-packed mozzarella,* drained, thinly sliced

Cover bottom and sides of each of 2 large colanders with 1 layer of eggplant slices; sprinkle generously with coarse salt. Continue layering eggplant slices in each colander, sprinkling each layer with coarse salt, until all eggplant slices are used. Place each colander over large bowl; let stand at least 30 minutes and up to 1 hour. (We just laid them out on paper towels, which worked fine.) Rinse eggplant slices to remove excess salt; dry thoroughly with paper towels.

Position oven rack 5 to 6 inches from heat source and preheat broiler. Line 3 large rimmed baking sheets with parchment paper. Arrange eggplant slices in single layer on prepared baking sheets. Brush both sides of eggplant slices with olive oil. Broil 1 sheet at a time until eggplant slices are tender and beginning to brown, watching closely and removing eggplant slices as needed if cooking too quickly, 3 to 4 minutes per side. Remove baking sheet from oven and cool eggplant while preparing filling.

This was our first time using our oven's broiler!

Bring large pot of salted water to boil. Add chard to pot and boil just until tender, about 2 minutes. Drain; rinse with cold water. Squeeze chard very dry, then chop coarsely. Squeeze chard dry again between paper towels. Whisk eggs and pinch of coarse salt in medium bowl. Stir in chopped chard, ricotta cheese, 1 cup Parmesan, mint, and black pepper.

Lightly oil 15 x 10 x 2-inch glass baking dish. Spread half of tomato sauce evenly over bottom of dish. Divide chard-ricotta filling among eggplant slices, placing about 1 heaping tablespoon filling in center of each. Starting at 1 short end of each, loosely roll up eggplant slices, enclosing filling. Arrange rolls, seam side down, atop sauce in baking dish. Spoon remaining tomato sauce over. Place mozzarella slices in single layer over rolls. Sprinkle with remaining 1/4 cup Parmesan cheese. DO AHEAD: Can be made 1 day ahead. Cover with foil and chill.

Preheat oven to 350°F. Bake eggplant Parmesan rolls, covered with foil, until heated through, about 30 minutes if freshly made or 40 minutes if refrigerated. Uncover and bake until brown in spots and sauce is bubbling, 15 to 20 minutes. Serve hot.

Here is us chilling on the fire escape while the eggplant baked:

And here is an aerial view of our meal. It looks like Hill's arm is moving SO FAST!!!


YUM.

Sunday, April 12, 2009

"Well, SURELY this isn't gonna be disgusting." (The BEST baklava EVER) by Alena and Faryl

The day started on an UP note, Alena and Faryl (us), got Chipotle on our way to pick up Alena's FREE Cuisinart food processor!!!! And POST processor pick-up; guess what?! We were gonna make BAKLAVA!
We chose between two very competent recipes and decided on the one from Epicurious.


We wrote it on a piece of pape so we didn't have to move the computer.
(It looks like E.T. is helping to hold it for us.)

Middle Eastern Nut-Filled Multilayered Pastry (Baklava)

Ingredients:

(We cut the amounts in this recipe in half.)

Syrup:

* 3 cups sugar, or 2 cups sugar and 1 cup honey
* 1 1/2 cups water
* 2 tablespoons lemon juice
* 2 tablespoons light corn syrup (optional) - We left it out!
* 2 (3-inch) sticks cinnamon (optional) - We put it in!
* 4 to 6 whole cloves, or 1/2 teaspoon ground cardamom (optional)- We left it out!


Filling:

* 1 pound blanched almonds, pistachios, walnuts, or any combination, finely chopped or coarsely ground (about 4 cups)
* 1/4 cup sugar
* 1 to 2 teaspoons ground cinnamon
* 1/4 teaspoon ground cloves or cardamom (optional)


* 1 pound (about 24 sheets) phyllo dough
* About 1 cup (2 sticks) melted butter
or vegetable oil - (go with butter, seriously.)

SO. With the newly acquired CUISINART we thought to ourselves, let's fire this baby up and grind up some pistachios, walnuts and almonds! We lifted the heavy thing out of the box. (Did I mention we carried it from 111th street to 92nd?) To our dismay, the Cuisinart in the box did not resemble the shiny, stainless steel model pictured above. In size and shape, yes, the similarities were there, but this guy was probably circa 1978 - complete with some very stylish (for the time) tan and brown plastic attachments. AESTHETICS ASIDE -- It looked sturdy and functional. Everything a Cuisinart should be. We assembled it, plugged it in and....


nothing happened. The shiny metal blade remained inert. The machine was still.

Hell no, we thought. We carried this thing in our little arms all the way from 111th street! It HAS to work!

We moved some pieces around, unplugged, plugged back in, tried again. Nada.

I (alena) wanted to cry a little. BUT - didn't. We found that Nick's coffee grinder served as an excellent nut grinder too. We moved on:

1. To make the syrup: Stir the sugar, water, lemon juice, and if using, the corn syrup, cinnamon sticks, and/or cloves over low heat until the sugar dissolves, about 5 minutes. Stop stirring, increase the heat to medium, and cook until the mixture is slightly syrupy, about 5 minutes (it will register 225 degrees on a candy thermometer). Discard the cinnamon sticks and whole cloves. Let cool.

2. To make the filling: Combine all the filling ingredients.

3. Preheat the oven to 350 degrees. Grease a 12-by-9-inch or 13-by-9-inch baking pan or 15-by-10-inch jelly roll pan.

4. Place a sheet of phyllo in the prepared pan and lightly brush with butter. Repeat with 7 more sheets. Spread with half of the filling. Top with 8 more sheets, brushing each with butter. Use any torn sheets in the middle layer. Spread with the remaining nut mixture and end with a top layer of 8 sheets, continuing to brush each with butter. Trim any overhanging edges.

5. Using a sharp knife, cut 6 equal lengthwise strips (about 1 3/4 inches wide) through the top layer of pastry. Make 1 1/2-inch-wide diagonal cuts across the strips to form diamond shapes.

6. Just before baking, lightly sprinkle the top of the pastry with cold water. This inhibits the pastry from curling. Bake for 20 minutes. Reduce the heat to 300 degrees and bake until golden brown, about 15 additional minutes.

7. Cut through the scored lines. Drizzle the cooled syrup slowly over the hot baklava and let cool for at least 4 hours. Cover and store at room temperature for up to 1 week. If the baklava dries out while being stored, drizzle with a little additional hot syrup.


Ground nuts!

Syrup!

Faryl's Aunt Rae is a famous Bakalva maker and she has an instructional DVD that shows how to cut it special... but she (I) forgot.

The recipe says to chill the Baklava for 4 hours. I would like to say "F THAT". We waited about 10 minutes before diving into that pastry and it was DELICIOUS. Faryl's attitude changed from one of apprehension and skeptical hope ("Well, surely this isn't gonna be disgusting,") to proclaiming it "the best baklava EVER". I (Alena) would have to agree! Make it! You will eat it all out of the pan without even waiting for it to cool.

And as for the Cuisinart?

Nick arrived home, switched around one part, and BOOM.

IT WORKED. SUCCESS ALL AROUND.

(Thanks Nick.)


Yo, we made that shit.