Friday, January 23, 2009
I made Hill's Dad's Thumbprint Cookies!
The title says it all. I wanted to bake some cookies to bring to a LOST-viewing party on Wednesday, and the choice was clear - these cookies. I followed the recipe precisely, except I substituted raspberry jam for apricot jam and omitted the almonds (just in case anyone at the party had a nut allergy.) They were so popular, and every last cookie was eaten. People were very impressed that I had made them, but as Hillary noted in her post, they are very simple to make!
If you decide make these with raspberry jam, I recommended heating the jam over the stove until it liquifies slightly, and then pass it through a strainer to separate the seeds (that is what I did). That way your cookies will have perfect circles of smooth, flavorful jam with no crunchy seeds getting in the way.
But seriously, check out Hill's post and make these sometime, they are so delicious. (I bet Hurley would love them.)
We made Bulgur Veggie Burgers with Lime Mayonnaise
"What if we made our own veggie burgers?"
I clicked on the link she had pasted below. Homemade veggie burgers with pinto beans, walnuts, cilantro, the aforementioned bulgur, and more ? I was sold. The truth is, I have never made veggie burgers before, though I do love them. I was ready to tackle this project, and to succeed.
RECIPE:
Originally published in Gourmet (June 2008)
Ingredients:
1/2 cup chopped onion, divided
1 tablespoon olive oil plus additional for brushing
1/2 cup bulgur
1 cup water
1 cup canned pinto beans, rinsed and drained
1 1/2 tablespoon soy sauce (Sarah -- I just noticed this ingredient!! We definitely forgot it.)
3/4 cup walnuts (2 1/2 ounces)
2 garlic cloves, coarsely chopped
1/2 cup packed cilantro sprigs
3/4 teaspoon ground cumin
1/4 teaspoon cayenne
1/4 cup mayonnaise
1/4 teaspoon grated lime zest
1/2 teaspoon fresh lime juice (Just squeeze a whole lime.)
4 slices multi-grain bread,toasted (OR 8 slices, if you are not interested in serving them open-faced.)
Preparation (I put my notes in parentheses):
Cook half of onion with 1/4 teaspoon salt in oil in a small heavy saucepan over medium heat, stirring occasionally, until golden, 5 to 7 minutes. Add bulgur and water and cook, covered, over low heat until water is absorbed, 15 to 18 minutes. Transfer to a bowl and stir in beans and soy sauce.
Pulse bulgur mixture, walnuts, garlic, cilantro, cumin, cayenne, a rounded 1/4 teaspoon salt, 1/2 teaspoon pepper, and remaining onion in a food processor until finely chopped. (As you can see, we abandoned the food processor idea and used the trusty hand blender instead. I love that thing.)
Form rounded 1/2 cups of mixture into 4 (31/2-inch-diameter) patties. Chill at least 10 minutes.
While patties chill, stir together mayonnaise, zest, and juice. (Let me tell you, I do not typically like mayo, but this one was so tangy and light, and I was into it. I bet a vegan mayo substitute would work fine too.)
Prepare grill for direct-heat cooking over medium-hot charcoal (medium heat for gas). Put perforated grill sheet on grill and preheat 10 minutes. (Obviously it is January, so we did not grill these. ****See "Cook's note" below for details on cooking in a pan. It works fine!)
Brush patties all over with oil. (Again, if you're not grilling, just put oil in the pan. Sarah gets credit for pan-cooking these to perfection. They are a bit crumbly, but wont fall apart on you.)
Oil grill sheet, then grill burgers on grill sheet, covered only if using a gas grill, carefully turning once, until golden brown, about 8 minutes total.
Serve burgers open-faced on toast with lime mayonnaise. (We served them "closed-faced" on toasted bread and garnished with thin slices of cucumber, plum tomato, and avocado. Of course you can put any of your favorite burger toppings on these, but in my opinion, these are the perfect toppings - the crunchy cucumber slices in particular are HIGHLY recommended.)
****Cooks' notes: ·Burgers can be cooked on the stove. Heat 1 tablespoon oil in a 12-inch heavy skillet over medium heat until it shimmers, then cook patties, carefully turning once, until golden brown, about 8 minutes total.
·Uncooked patties can be chilled, covered, up to 4 hours.
As we cooked, I decided to find out if Hillary would be coming home soon. This is what happened:
Hill came home, and along with Suz, we all shared these yummy burgers while watching Gossip Girl, in which all the characters went to some opening at the Opera. People fought, people made up, people wore fancy dresses. It was cool.
The burgers have a really nice smooth texture. Sometimes veggie burgers can be dry - but these were really moist, somewhat falafel-like in texture. The walnuts give it a nice sweetness and the cilantro and lime flavors were really tasty.
(We did not take this photo, but someone named Romulo Yanes took it when the recipe ran in "Gourmet". Ours looked different, but equally delicious. I forgot my camera, decided to use my phone, and then only took one silly picture. Oops.)
We also made a quick a delicious pear-goat cheese-arugula salad to eat with these, which was great. Pears have been tasting really good to me lately.
This is the perfect meal to enjoy while balancing a plate on your lap in front of the TV.
I made pomegranate cake!
If pomegranate cake exists... then true love must exist!
I found this Nigella recipe on the NPR website (weird) and pretty much followed it (anything I changed is in italics):
POMEGRANATE JEWEL CAKE
Serves 10
8 eggs
Pinch of salt
1 1/2 cups superfine sugar (If you have regular sugar, you can make it superfine by grinding it in a coffee grinder. But don't grind too much, or it will become powdered sugar. True story.)
Zest of 1 lemon
Zest of 1 orange
3 cups ground almonds (I used Almond Meal from Trader Joes)
2 pomegranates, 1 juiced and 1 seeded (I'm sorry but you've got to be out of your mind to juice a pomegranate. Buy some damn pom juice, end of story. In addition to the pom juice, I seeded TWO pomegranates, because your pomegranate cake really can't have TOO MANY seeds on top, can it?)
Preheat the oven to 350 degrees. Grease and line with parchment paper a 9-inch spring form pan. (If you don't have any parchment paper and your pan is not of the springform persuasion, fear not; it'll work just fine.)
Separate the eggs, putting the whites into a large bowl, and the yolks into a separate bowl. Whisk the egg whites with a pinch of salt until they are stiff but not dry and then whisk in a half-cup of sugar before putting bowl aside.
Add the remaining cup of sugar and zest to the yolks and beat until the mixture is light and airy, then beat in the ground almonds. This will be very thick and heavy, so lighten it with a good dollop of whisked egg whites before folding the rest of them into the thick, yellow almond mixture. It's easiest to fold in the remaining egg whites in thirds. You need to work firmly, but gently, so everything is combined without the mixture losing its air.
Pour into the lined and greased pan and bake about 40 minutes, though check at 30 minutes, as you don't want this to scorch. If the cake is brown enough, but still gooey in the middle, loosely cover with a sheet of aluminum foil.
When the cake comes out of the oven, pour the juice of one pomegranate over the cake while it is still hot and in the pan. Let the cake cool and absorb the pomegranate juice and leave until cold before removing the sides of the pan. Place the cake on a serving plate and cover with pomegranate seeds.
GET READY FOR TRUE LOVE!!!
Thursday, January 22, 2009
I made smashed chick pea salad and ate it in a sandwich
It was perfect. All the things I wanted. Quick, easy, satisfying. And I had enough for lunch the next day. Here is the recipe with my notes:
Smashed Chickpea Salad
1 15-ounce can chickpeas, drained and rinsed
2 tablespoons pitted, halved and very thinly sliced black olives
1 tablespoon finely chopped red onion
1 tablespoon chopped fresh parsley
Zest and juice from half a lemon (I definitely used all the juice of both halves)
Couple good pinches of salt
A few grinds of black pepper
A few glugs of olive oil (the original is quite oily, like bread-soaking oily, I went a little lighter. Both ways are delicious)
Mix everything but the olive oil in a small to midsize bowl. Very lightly smash the chickpea mixture with the back of a fork or a potato masher. You’re not looking for a hummus-like puree but something closer to a coarse chop with a few smaller bits to hold it together. Add the glugs of olive oil, mix it lightly and enjoy. I don't own a potato masher, and I didn't find the back of a fork effective because those damn chick peas are so slippery, so I used the bottom of a can. Worked fine. As the recipe says, you don't really need to get them fully mashed.
This would have been fine alone on toasted bread, but Smitten had a few serving suggestions, like spreading tahini on the bread and layering some roasted red pepper. I put crumbled feta and sliced avocado on my sandwich.
This is Smitten's picture, not mine, as I was cameraless. But this is pretty similar to what it actually looked like. Just imagine avocado instead of red pepper:
This was a tasty but messy sandwich. Especially the one I packed for work the next day. A little awkward to eat at lunch with colleagues. Next time I make this I'm going to figure out a way to make it bind a little more. It also doesn't really need the bread--I had to stop myself from eating it straight from the bowl.
I made pasta puttanesca
All I know is, I could eat this sauce all the time. I like it with a flat pasta like fettucini or linguini. I've also had it on tilapia, which was delicious as well. I'd like to try making a pizza with it.
For a long time, making pasta sauce from scratch was intimidating to me. It always seemed like something that requires some sort of elusive magic touch brought on only by culture or experience. But puttanesca is actually very easy. Like most red sauces, the longer you cook it, the better.
This is the recipe I've always used, which I found just by searching online until I came across one that sounded just right. It's from Emeril Lagasse, whose show I've never watched, but this recipe has become part of my regular repertoire. I pretty much follow it exactly except that I let it cook as long as is convenient, add a handful of fresh parsley and a splash of red wine. Oh--and I use about twice the amount of olives and capers. Here it is with some comments, in bold:
Pasta Puttanesca
Ingredients
1/4 cup olive oil
1 cup finely chopped onion
6 cloves minced garlic
2 (28-ounce) cans Roma plum tomatoes, broken into pieces, with juice
1 cup tightly packed, pitted, and halved Kalamata olives (double those olives!)
2 tablespoons tomato paste
2 tablespoons drained capers (toss in the whole jar!)
2 tablespoons minced anchovy fillets (about 8 fillets) (A lot of people think they don't like anchovies. You really don't notice them when you eat the sauce, but they are essential for flavor. They are also kind of gross to handle and chop. But you just gotta deal! They are crucial for this sauce.)
1/2 teaspoon dried crushed basil (and fresh parsley!)
1/2 teaspoon dried crushed red pepper flakes (used a lot more than this)
Salt
1 pound penne pasta, cooked to al dente (fettucini!)
And a splash of red wine!
Directions
In a large pot heat the olive oil over medium high heat. Add the onion and saute until soft and lightly caramelized, about 6 minutes. Add the garlic and cook an additional 2 minutes. Add the tomatoes and the remaining ingredients and simmer until the sauce is thickened and slightly reduced, about 40 minutes (This time I let it cook for an hour and a half). Adjust seasoning, to taste, cover and set aside. Add penne pasta (FETTUCINI!!) to the pan and toss for 1 minute. Serve with fresh grated parmesan or pecorino romano.
Tuesday, January 20, 2009
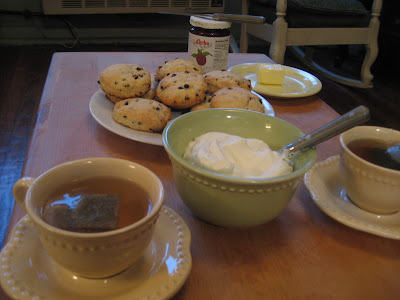
Cream Scones with Currants made by Alena and Hill
I really wouldn't change anything about the recipe below - however in the future I might experiment with different flavors such as chocolate chips, dried cranberries or crystallized ginger....or even all of those things together.
Cream Scones (From America’s Test Kitchen Cookbook)
2 cups (10 ounces) unbleached all-purpose flour
1 tablespoon baking powder
3 tablespoons sugar
1/2 teaspoon salt
5 tablespoons chilled, unsalted butter, cut into 1/4-inch cubes
1/2 cup currants
1 cup heavy cream
Adjust oven rack to middle position and heat oven to 425 degrees.
Place flour, baking powder, sugar and salt in large bowl or work bowl of food processor fitted with steel blade. Whisk together or pulse six times.
If making by hand, use two knives, a pastry blender or your fingertips and quickly cut in butter until mixture resembles coarse meal, with a few slightly larger butter lumps. Stir in currants. If using food processor,remove cover and distribute butter evenly over dry ingredients. Cover and pulse 12 times, each pulse lasting 1 second. Add currants and pulse one more time. Transfer dough to large bowl.
Stir in heavy cream with a rubber spatula or fork until dough begins to form, about 30 seconds.
Transfer dough and all dry, floury bits to countertop and knead dough by hand just until it comes together into a rough, sticky ball, 5 to 10 seconds.
Form scones by either a) pressing the dough into an 8-inch cake pan, then turning the dough out onto a lightly floured work surface, cutting the dough into 8 wedges with either a knife or bench scraper (the book’s suggestion) or b) patting the dough onto a lightly floured work surface into a 3/4-inch thick circle, cutting pieces with a biscuit cutter (as you can see we used the lid of a jar!), and pressing remaining scraps back into another piece and cutting until dough has been used up.
Before baking, we also scored the edges of the scones with a knife to make them look more finished, or cuter, really. Scones are pretty cute no matter what, but this technique makes them a tiny bit cuter.
Place rounds or wedges on ungreased baking sheet and bake until scone tops are light brown, 12 to 15 minutes. Cool on wire rack for at least 10 minutes. Serve warm or at room temperature.
As the scones baked, we prepared some tea and got all the fixings ready for a little tea party. After researching the traditional pairing for scones, clotted cream, we discovered that it is virtually impossible to recreate at home, so we settled on making some traditional whipped cream. We did this the old fashioned way, with just a chilled bowl, a whisk, and lots of stirring. Making whipped cream this way teaches patience and endurance. We added a teaspoon of vanilla extract and approximately two teaspoons of sugar to the cream, however, since the scones are nice and sweet, in the future I would leave out the sugar when making whipped cream as a scone topping.
Tea party!
Monday, January 19, 2009
I made sausage and black-eyed peas with cornbread!
1/2 cup yellow onion, chopped
1 stock celery, chopped
1 small green pepper, chopped
1 small red pepper, chopped
1 clove garlic, chopped
2 links andouille chicken sausage, cubed**
1 can black-eyed peas, drained and rinced
1 can diced tomatoes
Olive oil
Cayenne pepper (if you like it spicy)
Sautee the olive oil (just enough to cover the pan lightly) onions, garlic, green and red peppers over a medium heat. Add the chicken sausage, mix it up well and put a lid on while it cooks over a medium heat for approximately 10 minutes (or til those meats start getting juicy). Throw in the diced tomatoes, celery, and black eyed peas- mix well again. Put the lid back on, turn the heat down to a simmer-- but not too low because you want those black eyed peas to cook up right. Use a "3" or "4" if you have a 1-10 heat dial on your stove.
1 cup all-purpose flour
1 cup yellow cornmeal
1 tablespoon baking powder
1 teaspoon baking soda
1/2 teaspoon salt
3/4 cup buttermilk
1/4 cup honey
2 jalapeno peppers, seeded and minced
1 large egg
Preheat oven to 425°. Combine flour, cornmeal, baking powder, baking soda, and salt in a large bowl. Combine buttermilk, honey, peppers, and egg in a bowl; add to flour mixture. Stir just until moist. Pour batter into an 8-inch square baking pan coated with cooking spray. Bake at 425° for approximately 15 minutes.
Turn off the oven and stove, and ENJOY! It's a little taste of Southeast Texas in New York City. Yee haw!
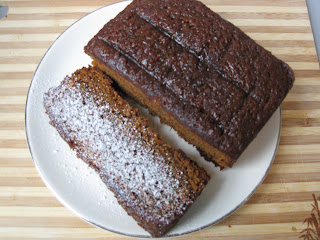
I made Gingerbread!
This is the recipe on Epicurious: http://www.epicurious.com/recipes/food/views/Gramercy-Tavern-Gingerbread-103087
My notes are in bold.
- 1 cup oatmeal stout or Guinness Stout (I used Guinness Stout -- and you can drink the rest as you cook!)
- 1 cup dark molasses (not blackstrap) (I wasn't sure what "dark molasses" was, so I used the regular yellow Grandma's jar -- seemed fine.)
- 1/2 teaspoon baking soda
- 2 cups all-purpose flour
- 1 1/2 teaspoons baking powder
- 2 tablespoons ground ginger
- 1 teaspoon ground cinnamon
- 1/4 teaspoon ground cloves (I omitted the cloves as I'm not a clove fan)
- 1/4 teaspoon freshly grated nutmeg
- Pinch of ground cardamom
- 3 large eggs
- 1 cup packed dark brown sugar (I used regular brown sugar)
- 1 cup granulated sugar
- 3/4 cup vegetable oil (I used canola)
- Confectioners sugar for dusting
Special equipment:
- a 10-inch (10- to 12-cup) bundt pan (I don't have a bundt pan, so I used two loaf pans. The results were two low cakes. Maybe you could use just one pan? It would probably take longer to bake...)
1. Preheat oven to 350°F. Generously butter bundt pan and dust with flour, knocking out excess. (Smitten Kitchen emphasizes making sure you butter the pan enough. I didn't lose any cake except for a thin coating on part of the bottom)
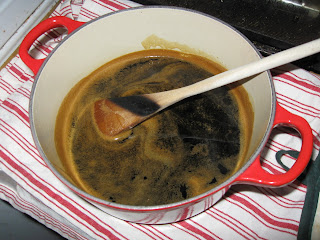
2. Bring stout and molasses to a boil in a large saucepan and remove from heat. Whisk in baking soda, then cool to room temperature.
3. Sift together flour, baking powder, and spices in a large bowl. (This is where I added the salt)
4. Whisk together eggs and sugars. (This is where I added the vanilla)
5. Whisk in oil, then molasses mixture. Add to flour mixture and whisk until just combined.
Wet and dry ingredients, about to be combined...
6. Pour batter into bundt pan and rap pan sharply on counter to eliminate air bubbles. Bake in middle of oven until a tester comes out with just a few moist crumbs adhering, about 50 minutes (It was exactly 50 minutes for me). Cool cake in pan on a rack 5 minutes. Turn out onto rack and cool completely.
7. Serve cake, dusted with confectioners sugar, with whipped cream. (I didn't have whipped cream, just confectioners sugar, which was delicious. Ice cream would also be a great topping).
The final product.
Note from Smitten Kitchen: This gingerbread is better if made a day ahead. It will keep 3 days, covered, at room temperature.
I made Minestrone!
Recipe served two people with extra for the next day!
2 Tbs olive oil (I also added ~1/2 tbs. of butter)
1 onion diced (I used red, but I normally use yellow)
2 cloves garlic, minced
2 medium potatoes, cubed
1/2 sweet potato, cubed (this was leftover from my sweet potato quesadillas! It kept very well in the fridge)
2 carrots, diced (I cut these a little smaller than that potatoes, because I always feel like carrots take longer)
1 cup tomato puree
1 tsp tomato paste
1 quart vegetable broth (you could use chicken)
Parmesan rind (If you use fresh parmesan, save the rind when you're done with it and add it to soup when you add broth. It's supposed to add flavor)
1 can beans, rinsed (I used Navy beans, but I thought about using chick peas)
herbs (I used thyme and a dash of basil this time, but I've also used rosemary and oregano at other times. I think I used about a 1/2 Tbs of thyme and a few shakes of basil)
2-3 bay leaves
salt and pepper to taste (beans need a good amount of salt)
1 cup cooked pasta
optional toppings: grated parmesan, good bread, fresh herbs
1. Heat oil and/or butter in a large soup pot over medium high heat.
2. When it is hot, add potatoes, onion, garlic, and carrots and saute until onions are translucent and everything is beginning to brown (~10 minutes).
3. Clear a space in the middle of the pot and add tomato paste. Cook it a little bit before mushing it around with the vegetables. Add tomato puree and let it cook a few more minutes.
4. Add broth (plus extra water, if needed), herbs, parmesan rind, bay leaves and a dash of salt and pepper. Turn up the heat and let the soup come to a boil, then turn down to simmer. Cook until the vegetables are tender. When the vegetables are first starting to get tender, add the beans to the soup and put on the water for pasta. You can also cook the pasta IN the soup if you're not pureeing it. I tend to overcook the pasta when I do that, so I usually just use a different pot.
5. Remove the bay leaves (they have very sharp edges so you need to take them out) and rind! Blend the soup. (I have an immersion blender which I absolutely love since it is much easier than a regular blender. If using a regular blender, do NOT overfill and make sure to hold the top on with a dishtowel so you don't end up with hot liquid everywhere. This happened to me over the weekend when I was blending Mexican hot chocolate at my parents' house. Whoops.) Taste and add more salt/pepper/herbs, if needed.
6. Put pasta in a bowl and top with soup and any desired toppings. Enjoy!
Final thought: I really like poaching eggs in leftover soup. It's very easy -- reheat the soup on the stove (add extra water if needed -- soup can thicken up overnight), and when it's simmering, crack an egg into the middle and cover. If the egg top doesn't cook fast enough, spoon some hot liquid on top.
Sunday, January 18, 2009
Buh-NAna-NAna!Bread with Alena & Faryl
On Christmas Day, I received an email from Faryl with a link to the recipe for banana bread. "This is in the oven right now," she informed me. I thought it sounded like such a cozy winter baked good, and we made plans to recreate it soon.
And recreate it we did. This recipe comes from the old standby, "The Joy of Baking":
The ingredients:
1 cup walnuts or pecans, toasted and coarsely chopped (optional) - Faryl roasted some pecans in honey, maple syrup, cinnamon (and maybe some other things?) and we used those - Highly Recommended!!!
1 3/4 cups all-purpose flour
3/4 cup granulated white sugar
1 teaspoons baking powder
1/4 teaspoon baking soda
1/4 teaspoon salt
1 teaspoon ground cinnamon
2 large eggs, lightly beaten
1/2 cup unsalted butter, melted and cooled
3 ripe large bananas, mashed well (about 1-1/2 cups) - We also used an additional banana as a garnish on top of the bread
1 teaspoon pure vanilla extract
Preheat oven to 350 degrees F and place oven rack to middle position. Butter and flour (or spray with a non stick vegetable/flour spray) the bottom and sides of a 9 x 5 x 3 inch (23 x 13 x 8 cm) loaf pan. Set aside.
As you can see, we did not use a loaf pan, but a bundt pan! Either will work.
Place the nuts on a baking sheet and bake for about 8 to 10 minutes or until lightly toasted. Let cool and then chop coarsely.
In a large bowl combine the flour, sugar, baking powder, baking soda, salt, cinnamon, and nuts. Set aside.
In a medium-sized bowl combine the mashed bananas, eggs, melted butter, and vanilla. With a rubber spatula or wooden spoon, lightly fold the wet ingredients (banana mixture) into the dry ingredients just until combined and the batter is thick and chunky. (The important thing is not to over mix the batter. You do not want it smooth. Over mixing the batter will yield tough, rubbery bread.)
Scrape batter into prepared pan and place the slices of banana on top of the batter for garnish. (If using a bundt pan, which you will FLIP over after the banana bread cools, remember to put the slices of banana on the BOTTOM of the pan, so that they're on top when you flip it. You know what I mean.)
Bake until bread is golden brown and a toothpick inserted in the center comes out clean, about 55 to 60 minutes. Place on a wire rack to cool and then remove the bread from the pan. Serve warm or at room temperature. This bread can be frozen.
"The Finale"
This bread is so flavorful and moist. I enjoyed a piece that night for dessert AND the next day for breakfast with some coffee. Adding the pieces of banana as a garnish on top was something I had not done before, but will do every time from now on. They get carmelized, soft and so tasty.
Friday, January 16, 2009
I made a salad!
Hi There folks,
In times of cold weather I oft' find myself turning to the ever so beautiful fruit called pomegranate.
I associate this in my mind as "food of the dead" because of that beloved greek myth with Persephone and Hades. It apparently makes you goddess of the underworld...
If you are to believe the Pom hype, it seems the pomegranate could make you: live 1,000 years, give you a face lift, and make you less fat at the same time.
I like to incorporate the Pomegranate into fresh salads just because it tastes good! I really can't take street cred for this one, it's certainly something Mama made. Take a gander! Lemme know whatchu think!?
Ingredients:
Salad:
2 Cups of mixed greens, spinach, salad (whatever your green of choice is really)
1/2 Red Onion (Chop it up)
1/2 Pomegranate (I usually cut it in half and use the back of a spoon to tap the seeds out)
1 whole Avocado (cut into bite sized pieces)
1/2 apple (chopped)
1 whole navel orange ('cause it ain't got no seeds people, but if you don't mind 'em use a regular)
1 healthy sprinkling of feta cheese (crumbled)
Dressing:
1/4 cup of olive oil
1/4 cup of balsamic vinaigrette
3 tbs plain yogurt
1 clove pressed garlic
1 pinch of salt
1 pinch of pepper
1 spoonful of mustard
a bit of honey to taste (I like things less sweet...)
Enjoy it people. It's salad, and it's freakin' good for you.
Thursday, January 15, 2009
I made Sweet Potato Chili
Ok this is really weird. First there were two acorn squash dishes. Now, without even having read Laura's post, I made sweet potato chili with the intention of posting about it. Then I open up the blog to see she has just made sweet potato quesadillas! Crazy. Not to mention that almost all of our dishes have been orange: butternut squash, acorn squash, apricot cookies, and now sweet potatoes. I guess you just crave warmly colored food in cold weather.
Anyway, I've made sweet potato chili many times before, and this recipe is my own. The secret is in the sweetness of the potatoes in combination with smokiness of both fire-roasted tomatoes and chipotle.
Ingredients:
Some olive oil. Maybe 1/4 cup.
5 sweet potatoes, skinned and sliced into half-medallions
3 bell peppers of varying colors
2 yellow onions, coarsely chopped
1 carrot, skinned and thinly sliced
2 cans beans (I've used a pinto/kidney/black bean combo... but just black beans would be good. Or black and pinto.)
1/4 cup vegetable broth
1 cup chopped canned chipotle peppers in adobe sauce (these can hard to chop because they're messy and soft. I used scissors and then scoop out the sauce from the can. And of course, use less or more depending on how much heat you want.)
1 can yellow corn
1 28 oz can fire roasted tomatoes, broken apart, with juices
1 package seitan
4 cloves garlic, minced
1 tsp chili powder
2 tsp cayenne
salt
pepper
Any/all of the following for garnish:
Sour cream or plain yogurt
chives
black olives
sliced radishes
shredded cheese
chopped avocado
Heat a tablespoon or two of oil in the bottom of a large pot. Add two cloves garlic and one of the onions. Cook until translucent. Add sweet potatoes, carrot and broth. Cover, and cook until potatoes can be broken apart easily with a wooden spoon.
If you have a very big frying pan, you can combine the next two steps. Otherwise, follow as written because the seitan really needs contact with the pan to get brown. In a frying pan, saute the peppers until browned. In another frying pan, heat some oil, add the remaining garlic and onion, and when onion is browned, tear the seitan into little chunks and toss that in. Pour the juice from the package in too. Saute until seitan is browned.
Add peppers, onions, seitan and all other ingredients into the pot with the sweet potatoes and carrots. Break apart the canned tomatoes as you add them. Cook for a while, until consistency is thick enough.
Makes maybe 6-8 servings. Really hits the spot on a cold night.
Tuesday, January 13, 2009
I made Sweet Potato and Mushroom Quesadillas
recipe made for one (I ended up with some leftover filling):
corn/flour tortillas (I used corn)
1/2 red onion, minced
1 clove garlic, minced
1/2 large sweet potato, grated
5 mushrooms, sliced (I had cremini)
1 Tsp. tomato paste
salt and pepper, to taste
cumin
coriander
(I didn't have chile powder, but I would have used it if I had)
thin slices of cheese (I used cheddar)
optional garnishes: avocado, cilantro, hot sauce
1. Add Tbs canola oil to pan over medium heat. When hot, saute onion and garlic until onion is browned. Add cumin and coriander.
2. Put tomato paste in the pan and saute a bit, mixing in with the onion and garlic.
3. When onion is browned to your liking, add mushrooms and sweet potato to the pan as well as salt and pepper. Cook until the sweet potato is tender and mushrooms are cooked. If needed, add some water to de-glaze the pan, as the sweet potato can stick.
4. When the sweet potato is done, add a small amount of oil to another frying pan and put in first tortilla. Put slices of cheese on it, add cilantro and avocado, if desired, and then sweet potato mixture. Cover with second tortilla and cook until cheese melts and bottom tortilla crisps up a bit. Flip it over, carefully, to brown the other side. Add hot sauce and enjoy!
I ate two and had some leftover filling with some eggs the next morning.
Monday, January 12, 2009
We made Acorn Squash Quesadillas
Monday night Alena and I had plans to make dinner and—we’ll be honest—watch Gossip Girl. This is something we’ve done a few times before, but have always gotten so wrapped up in the cooking that we end up missing part of the show. We decided to start earlier this time and emailed all day about what to make. Finally, inspired by Laura’s earlier post on acorn squash, we settled on this recipe from Smitten Kitchen. Although we didn’t end up finishing before the show, we still managed to enjoy the episode and cook during commercials. Overall, it was a great success. The quesadillas were really hearty and had a great combination of flavors. And the leftovers even kept a few days in the fridge. I wrapped them in foil and took them to work with me, and even microwaved, they were still delicious.
Here are some things we learned from this experience:
1. Acorn squash really is a pain in the ass to cut. We really had to struggle with it. But once we were able to saw it in half, cutting the smaller pieces was much easier.
2. None of the grocery stores on the Polish side of Greenpoint sell poblano peppers or queso blanco. If we’d had the determination to go all the way down to the C-Town on the other side of town, we might have had better luck, but our substitutes worked fine.
3. Hand blenders are awesome. I hate using blenders or food processors because I can never get them to work right and they are annoying to clean. This is in direct conflict with my love of pesto, blended soups and as this recipe calls for, tomatillo salsa. But I forgot about the existence of hand blenders, and even forgot that my grandma gave me one a few years ago that I only used once or twice.
4. Chuck Bass is maybe the only character on TV that can get away with using the words “Dickensian” and “hoi polloi” in the same episode.
Here is the recipe, copied and pasted with our adjustments and commentary in bold:
Acorn Squash Quesadillas
Adapted from a Dos Caminos demonstration recipe, but similar to many found in their awesome book, ModMex
The secret to getting your quesadillas crisp, Lindquist insisted, is to cook them in either butter or lard, and no skimping. Not true. I have always fried my quesadillas in olive or vegetable oil, and they are always light and crispy. A griddle is best if you have one, but a regular old frying pan will do in a pinch. Duh—we used a frying pan and did two at once.
1 small/medium acorn squash
4 tablespoons vegetable oil
3 tablespoons diced white onion (We used a whole yellow.)
1 tablespoon minced jalapeno
1 clove garlic, minced (We roasted several cloves with the squash.)
2 poblano chiles, roasted, peeled and cut into strips (Again, no poblanos in Greenpoint. We just used regular green peppers and it was fine. The salsa was so spicy that the quesadillas didn’t really need any extra kick.)
Salt and pepper to taste
10-inch flour tortillas
1 cup shredded Mexican cheese blend of your choice (I used Muenster, not Mexican but worked great!) “Shredded Mexican cheese blend”? Deb, Deb, Deb (Smitten Kitchen author). Are you talking about those packages of orange and yellow Kraft confetti? And what do you think “Mexican” cheese is, anyway? We would have used queso blanco but couldn’t find it, so we settled on Muenster because we thought we needed something salty to balance out the sweetness of the squash.
Butter for frying quesadillas Again, veg or olive oil is just fine.
Garnishes: Julienned radishes, crema or sour cream and/or salsa verde cruda (recipe below)
First, roast the acorn squash. Preheat the oven to 400° and lightly oil a baking sheet. Halve the squash, scoop out the seeds (you can save them to toast later, if you wish) and cut each half into half-inch slices. Lay them on the baking sheet (with a few cloves of garlic!) and roast for about 20 minutes, until soft but not cooked to mush. (You’ll finish it in the pan.)
When cool enough to work with, use a paring knife or your hands to peel the skin off each slice. Lightly chop the squash and put it in a bowl.
Saute the onions, garlic and jalapeno in the oil until translucent. Add the poblano strips and cook for a couple minutes more. Add the squash and cook for another 5 or 10 minutes, until the squash is tender and the flavors have melded. Season with salt and pepper and take off heat.
Spread a few tablespoons of the cooked squash mixture onto one half of a 10-inch flour tortilla. Sprinkle with a couple tablespoons of the cheese. Fold over and place in a hot pan with oil, and fry until crispy. Cut the finished quesadilla into four triangles and top with your choice of garnishes. Eat while warm.
These are a little tricky to fry because they have so much stuff in them and are hard to flip, but you’ll get the hang of it. My technique is just to use enough oil to thinly coat the pan, and then fry on medium heat so the tortillas don’t burn before the cheese melts. Use your judgment on when to flip, depending on if you like them lightly browned or almost burnt. I think I ended up cooking mine maybe two minutes or so on either side?
Tomatilla Salsa [Salsa Verde Cruda]
We roasted the tomatillos for this and threw in some of the garlic we roasted with the squash. We highly recommend this.
10 tomatillos, husked and well washed, quartered
1/2 bunch of scallions, roots and green ends trimmed, cut into big segements
5 garlic cloves, smashed
2 jalapenos, roughly chopped (I think we used more than this. Maybe three.)
Pinch of allspice (We did not use this. Just some black pepper was fine.)
Salt to taste. Puree all ingredients together until very smooth either in a blender or food processor or with a hand blender. Season with salt and pepper.
There was a lot of left over salsa. I have since used it on sandwiches and just this morning put it on some eggs.
Sarah roasted a jalapeno on top of the burner (apparently she is a daredevil and uses this technique all the time - AK)
Blending up the salsa.
We also made a semi-improvised salad, which was crunchy and delicious, a great compliment to the creamy texture of the squash and melted cheese in the quesadillas. I was really into this salad. We started by purchasing a red cabbage and some radishes, which we decided that we would thinly chop and add to some mixed greens that Sarah had at home. After a bit more thought, we decided to add some hearts of palm, grated carrot, and slivers of red onion. We made a light, tangy vinagrette to pour on top. After the success of this salad, I felt inspired to use more red cabbage from now on. - AK